Thanks to the new security enhancements in FileMaker 18 Advanced, you will be able to make your solutions more secure than ever by using features to limit access to a solution, authenticate its users, encrypt the data, and enhance the solution’s overall functionality.
Manage Security dialog box in FileMaker 18
A very noticeable change in managing security in FileMaker Pro 18 versus using FileMaker Pro 17 would be the new Manage Security dialog box, pictured below.
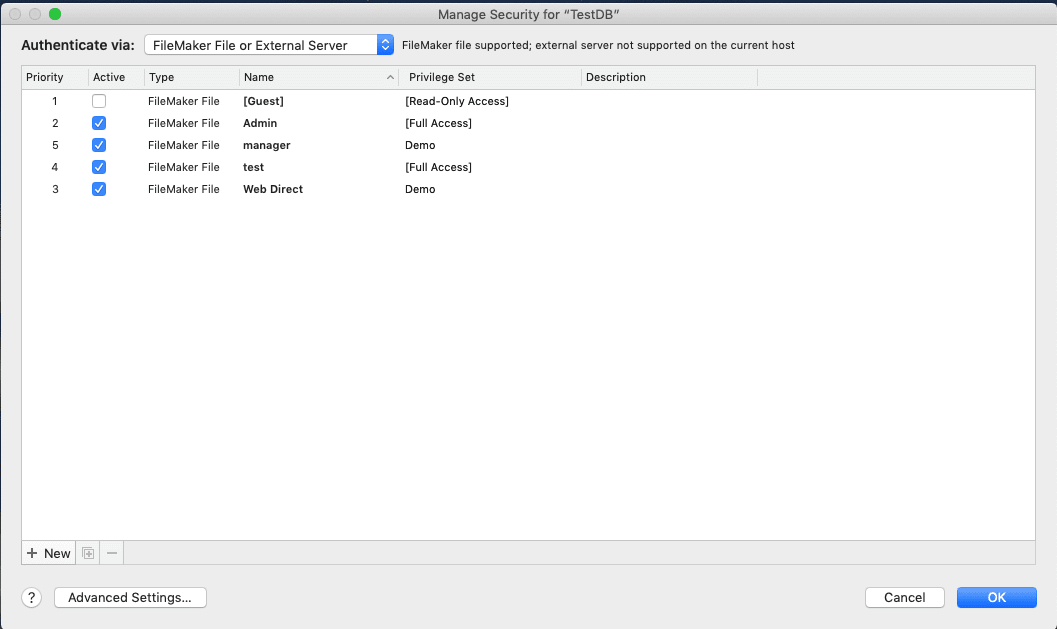
Most likely, the first thing you’ll notice will be the simplistic look and the lack of some familiar components from the old Manage Security dialog box. Fret not, this new dialog box will still allow you to manage accounts, privilege sets, extended privileges as well as file access.
Authenticating users in FileMaker 18
The main Manage Security dialog box displays a list of all the system’s accounts. This list is filtered, by default, by accounts authenticated via FileMaker File or External Server. This is shown above the list and can be changed to filter by one of the OAuth providers (Amazon, Google, or Microsoft Azure AD). From this list, a user with a [Full Access] privilege set is able to work with an account list filtered by priority, active/inactive, type, name or privilege set. Simple changes, such as changing the active status or assigning a privilege set, can be done directly inside the list. The new Manage Security dialog box allows you to see whether the selected authentication type is supported on the file’s current host.
Selecting an item on the list of accounts will display a new menu on the right side of the screen that allows you to manage more details pertaining to the selected account. This menu will allow you to change options like account name and password, require a password change upon next sign in, change a privilege set assignment, open the edit privilege set window or edit the account’s description.
At the bottom left corner of the accounts list, you will find the buttons to create a new account, duplicate the access to a file to another user or group or delete the account. An admin is able to create and modify account access in a shared file, even while clients are using it. The changes made will take effect immediately but do not disrupt any current clients. For example, if you made an account access entry inactive while clients are using it, their usage of the file would not be disrupted, but, once they close the file, they would not be able to reopen. Just as it was in FileMaker Pro Advanced 17, you can grant account access to as many users or groups as needed, and each file will contain two predefined accounts, Admin and Guest.
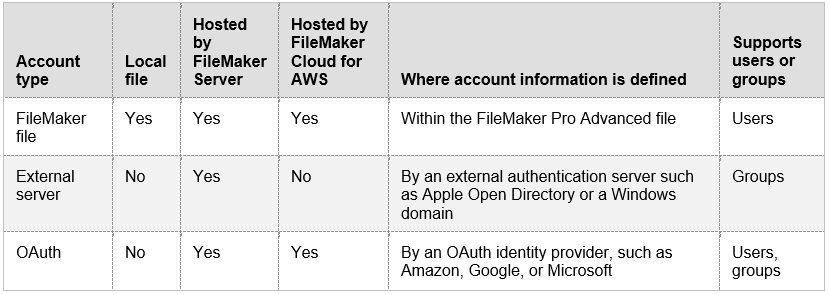
To create a new account, click the New button with the plus sign. It will create a new account with a default name, privilege set and other data for you to modify to your liking. FileMaker clients support multiple types of accounts, and they differ in their authentication processes. The FileMaker file account is the only type of account that defines the account name and password within FileMaker Pro Advanced. All other types use an external identity provider or authentication server to define the account info.
The following table summarizes which FileMaker hosts support each account type, where the account info is defined, and whether or not individual accounts are supported.
Two key things to remember:
- Only the FileMaker File account type can be used to open a local file.
- Microsoft Azure AD is the only supported OAuth identity provided that supports groups.
Creating and managing access and privileges in FileMaker 18
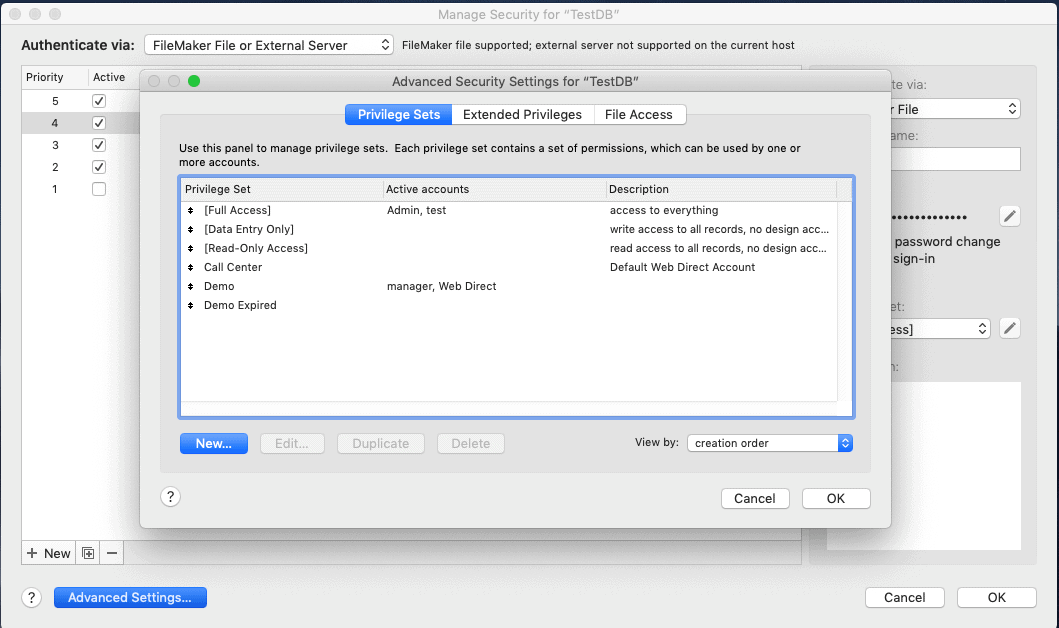
The components that were available at the top of the window in a tab control in FileMaker Pro Advanced 17, can now be found by clicking Advanced Settings, shown on the bottom left of the window in the new dialog box. This will open up a new window where you can manage privilege sets, extended privileges and file access.
Privilege sets in FileMaker 18
To create a new privilege set, enter the Privilege Sets tab of the Advanced Security Settings window and click the blue New button at the bottom left. To edit an existing privilege set, select the privilege set from the list, and once it is highlighted, click edit. Changes made to a privilege set will update all account access entries in that system that are using that privilege set. Below is a picture of the Edit Privilege Set dialog window, where you will see the available capabilities. Under Data Access and Design, you can see the defined privileges broken up into Records, Layouts, Value Lists and Scripts. At the bottom of each of those categories, you will be able to select “Custom Privileges…”, which will allow you to restrict access to individual tables, layouts, value lists and scripts.

Extended privileges in FileMaker 18
Extended privileges determine the data sharing options that are permitted by a privilege set for a file. In previous versions of FileMaker Pro Advanced, only accounts with a [Full Access] privilege set could manage accounts. In FileMaker Pro 18 Advanced, you can grant accounts with privilege sets other than [Full Access] to manage extended privilege sets, but it is required that the file is opened with an account that is assigned the extended privilege: Manage extended privileges. You will now be able to grant users the ability to create and delete access to a file and even assign existing privilege sets without allowing them to modify groups or users that have the [Full Access] privilege set or create or edit privilege sets.
To create an extended privilege, open the Extended Privileges tab of the Advanced Security Settings dialog box. Click New, at the bottom left, and you will see the following window:
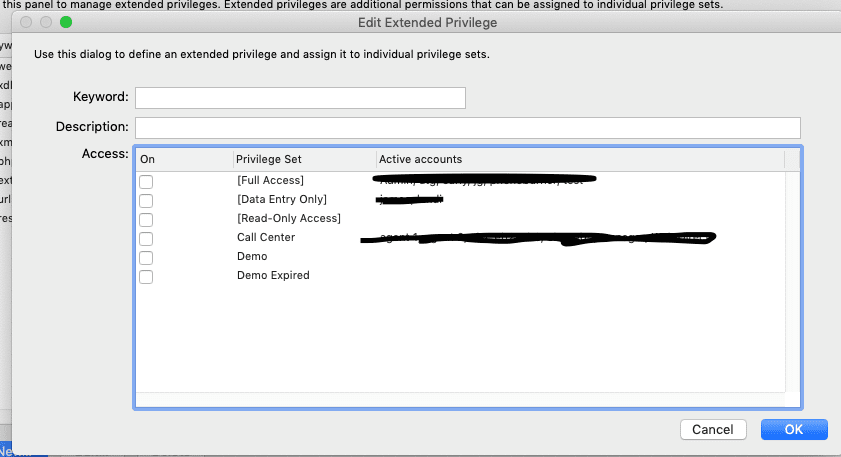
The field for description is optional, but a keyword to your desired Extended Privilege is required. Select a Privilege Set or multiple sets, inside the access box, to add that privilege to the set(s). It is important to note that all extended privileges (except fmreauthenticate10) are disabled by default, even in the [Full Access] privilege set.
File access in FileMaker 18
The last tab in the Advanced Security Settings dialog box is the File Access tab. This tab allows you to control whether other FileMaker Pro Advanced files are permitted to access the database schema in a file (layouts, tables, scripts, value lists). When protection is enabled, any use of the protected file will require authentication. So, in multifile solutions, you will need to authorize all of the files. Turning on protection is important because it prevents users from having the ability to create another file that uses tables of the original file but does not implement the same logic. This alternative file could bypass your logic, even though record level access would still be enforced. Along with that, turning on protection also prevents files that are not authorized from opening a protected file using the Open File script step. It is important to recognize that protecting a file and authorizing other files to access it is different from protecting a file’s record data.
To protect the file against unwanted access from other files, select Require full access privileges to use references to this file. If any files that reference the protected file are currently open, you will see an alert for each file, asking if you want to authorize the file. To remove authorization for a file, select the file for which you want to remove authorization, then click Deauthorize.
Unsigned plugins in FileMaker 18
Another security feature that comes new with the arrival of FileMaker Pro 18 Advanced is the unsigned plug-in notification. This means FileMaker Pro Advanced will notify you when a plug-in has not been digitally signed by its developer. If a plug-in is enabled, FileMaker will attempt to load it at two times, directly after when it’s installed, as well as whenever FileMaker Pro 18 Advanced starts. If the enabled plug-in is missing the digital signature of the developer, FileMaker will notify you, warning you that the plug-in has been modified since the developer created it. Once you see this notification you will have three choices:
- Ignore the warnings, and select Always load this plug-in. If you select this option FileMaker will load the plug-in, then add it to the list of permitted plug-ins. Once this is done, you will not receive any more notifications about the missing digital signature.
- If you would like to load the plug in, but not put it on the enabled plug-ins list, select Load Plug-in. Since the plug-in will not make it to the permitted plug-in list, you will continue to receive notifications about the missing signature.
If you are unsure why the plug-in is missing a signature, click Cancel and either search for a version of the plug-in that includes the signature, or contact the developer.
Noteworthy changes in FileMaker 18
Another FileMaker Pro 18 Advanced changed to keep in mind during development is the option to require the Full Access privilege set to use references to a file is now enabled by default on all new files. The option is unchanged in existing files.
Lastly, there is a set of new functions that will change the way developers can implement security practices. These functions are for digitally signing data and will allow you to digitally sign data and verify signatures of signed data with cryptographic keys. There are two functions that serve this purpose, CryptGenerateSignature, and CryptVerifySignature, these will be covered in a future blog covering all the new functions in FileMaker Pro 18 Advanced.
With these new tools, and the tools carried over from previous versions, developers should feel confident in their ability to protect their custom applications.